How To Design a Haunt
By Asianna Madsen
Imagine stepping into a world where shadows whisper and every creak of the floorboards sends shivers down your spine. Designing a haunt is about blending storytelling, atmosphere, and psychological thrills to create an unforgettable experience.
Haunt Enthusiasts can tell the difference between a well designed haunt and a poorly designed one. You have a lot of creative ideas for how to make your haunt interesting and exciting. You want it to look great, but you also need it to work great.
Give your guests the best experience possible so that they’ll spread the word about your event and come again next year. Your haunt design determines the quality of their experience. Layout and flow, themes, set design, costumes, and special effects are all factors that will influence the quality of your haunt’s design. Here’s how to turn your vision into a chilling reality.
Part of our Series:
Layout and Flow
There’s much more to designing a haunt than just making it look cool. You also need to determine where and how you’ll scare your guests and how they’ll navigate through each room.
No matter how spooky your haunt looks, it won’t be successful unless you can send a steady flow of guests through. We have some tips for how to effectively design the layout of your haunt.
Design for the Scares, Not the Looks
When you start planning a layout, it’s essential to remember that the scares come before the decorations. It doesn’t matter how sinister your haunt looks if there’s no way for your actors to startle your guests. Design your haunt primarily for the thrilling scares, and the details can come later.
Start by planning the path that your guests will take, and place the key scare zones. Determine where your actors will be so that you can guide the path around those points. When you design for the scares, even your weakest actor will be able to terrify your patrons. A good scare comes partly from the skills of the actor, but mostly it depends on how the room is designed.
For each room, you need to find the best way to scare your guests. Decide what kind of scare tactic you want to use. Is the actor going to hide and jump out when the group passes by? Are they going to chase the group through the room? Do you need to install any kinds of crash doors or sliding panels? Designing the room becomes simpler if you have a plan to scare your guests.
Shorten Sightlines
In order to create an eerie and ominous atmosphere, you need to control what your patrons can see. In a haunt, the less you can see, the better. If your guests don’t know what’s ahead of them, it will be easier to scare them.
Avoid long, straight corridors. The best haunt designs use winding paths to shorten the patrons’ sightlines. Add twists and turns before each room to hide what’s coming. This keeps your groups separated, and provides more opportunities to scare them.
Don’t use curtains to separate the rooms. Curtains help shorten the sightline, but are out of place in most settings, ruining the atmosphere you’ve created. Curtains also slow down the transition between rooms. Instead, make the guests turn a corner to get to the next room, or use props to block the view of the doorway.
Design for Maximum Capacity
Long lines discourage people from coming, so it’s important to accommodate as many people as possible. However, you also don’t want to cram too many people in and ruin the experience. When you put more people through your haunt than it’s designed for, the show quality suffers.
There are a few ways you can design your haunt to accommodate more people, without lowering the quality of the scares.
Scare Forward
In order to eliminate bottlenecks, make sure your actors scare guests forward and never block the path. Instead of jumping out in front of each group, startle them from the sides or behind. This will push the groups through your haunt quicker and get their adrenaline pumping.
Avoid Skit-type scares
Skits are slow, time consuming, and less effective for a haunt. Short, high impact scares are more ideal because they keep people moving forward.
If you are including a presentation to introduce a storyline, make sure you put it at the beginning of the haunt. It’s much better to set up the story before guests go in, rather than stopping people in the middle. You can even put several presentation rooms side by side to speed up the process. While one group is going in, the next group is already being given the storyline. You’ll see this type of design at many amusement parks because it’s more efficient.
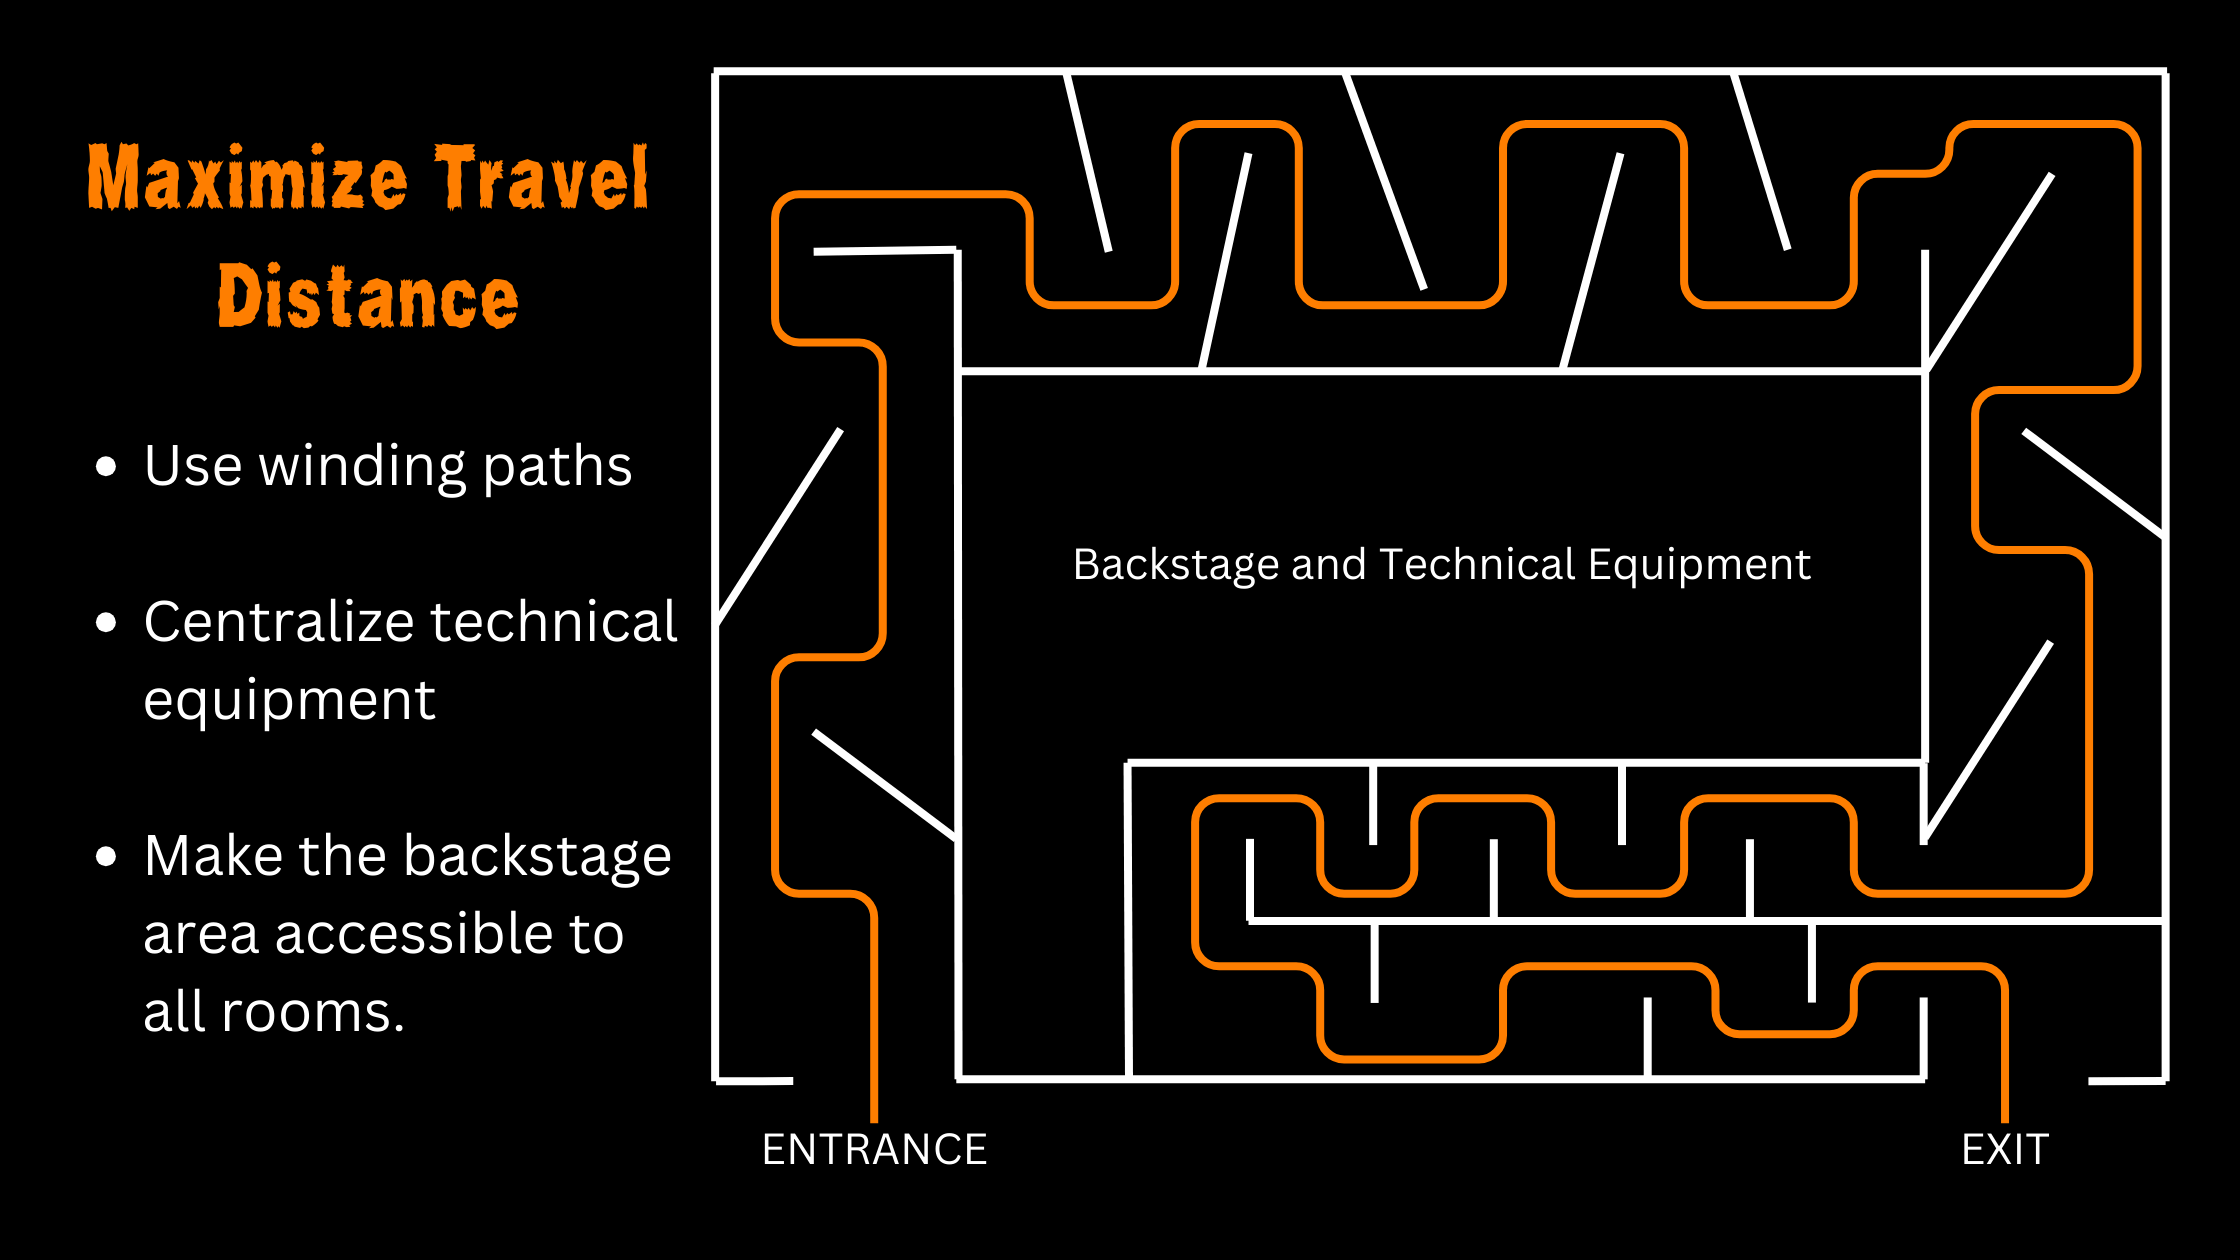
Maximize the travel distance
You can’t always control how quickly people go through your attraction, but you can determine how far they have to go to get to the exit. Even with limited space, you can get creative to maximize travel distance. Use narrow corridors, and include lots of twists and turns instead of having everything in a straight line.
Try using a more centralized design to reduce extra space being used by actors or special effects equipment. Place all of your technical equipment in the center of your space, and have the pathway wind around it. This way, your actors, special effects and electrical equipment are accessible to each room without taking up extra space.
Keep the Queue Line Interesting
Despite all of your efforts, you might still get some long lines. You can’t always avoid a lengthy queue, especially on those busy weekend nights. This can make it difficult to keep your patrons excited before entering the haunt. However, there are a few things you can do to make the line more interesting.
Place the Exit next to the Queue
If you can make it work in your space, try putting the exit next to your entrance or near the queue line. Seeing people come out of the haunt gives people a sense of flow. When people are exiting, it tells those waiting that it will be their turn soon.
Seeing scared groups hurrying out will also increase anticipation. Even hearing the screams coming from inside will get your patrons more excited. For this reason, it’s especially important that you place the best scare last. You want to make sure people are still scared when they exit, showing everyone waiting that real thrills are waiting inside.
Show off your actors
Letting your actors interact with people in the line is a fun way to keep people interested in your haunt. Your actors will already be in costume, so your guests will get a fun sneak peak of what to expect.
It also adds to the spooky atmosphere and lets your actors stay in character. For many actors, showing off their costumes and scaring people in the queue could be one of their favorite parts of the job.
Themes and Set Design
Now that you have your haunt layed out, it’s time to transform it into a spooky, bone-chilling experience. The scares will make your haunt thrilling, but the visual design is what will make it eerie and haunting.
Choosing a Theme
Every great haunt has a fun and intriguing theme. Having a theme gives you a starting point for finding decorations, and makes the whole thing cohesive.
Design your haunt around a story to help it be more engaging and intuitive. This also helps you focus the design of your haunt. Your story can be as simple or complex as you want. You could choose a location, monster, or a horror movie to base your haunt off of. The possibilities are endless, but here are some ideas to get you started.
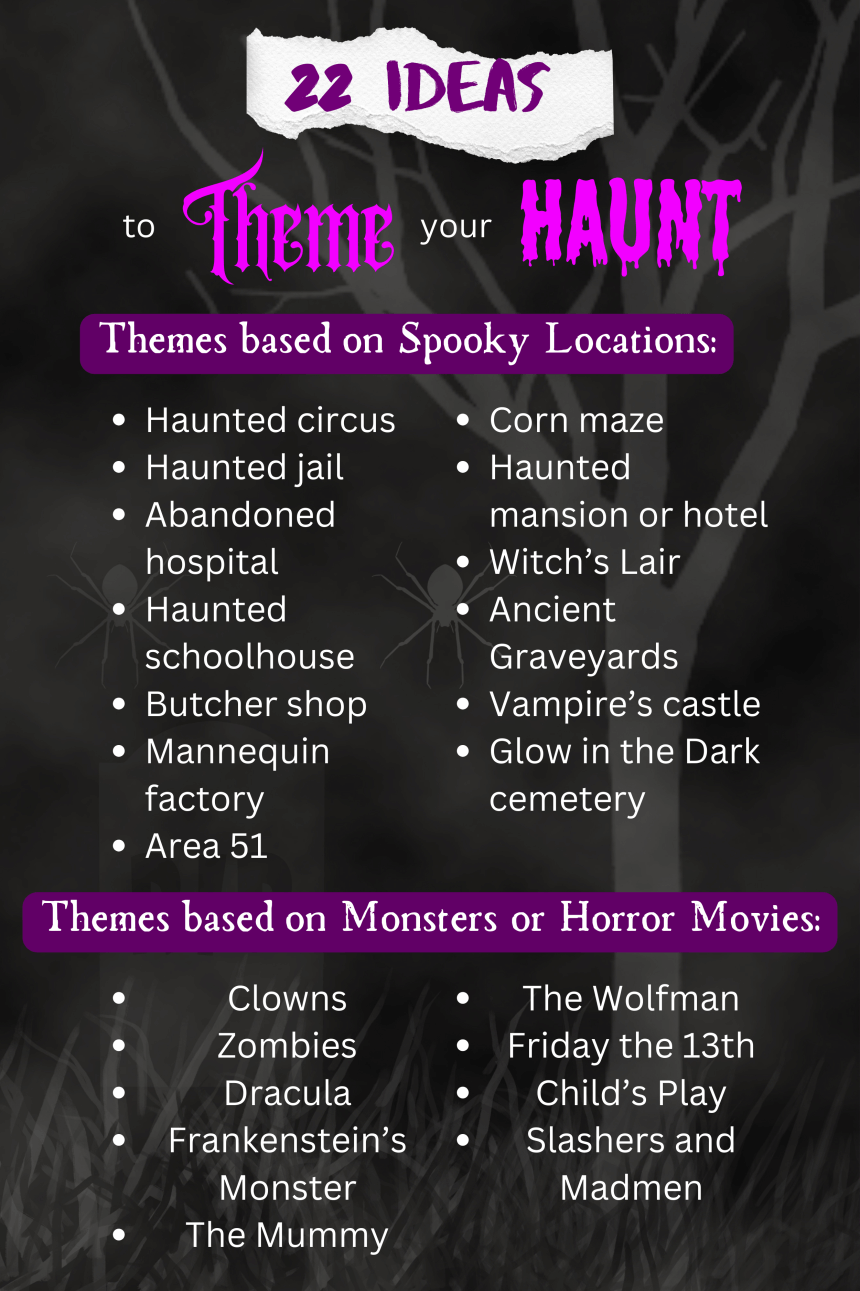
Spooky Locations:
-
Haunted circus
-
Haunted jail
-
Abandoned hospital
-
Haunted schoolhouse
-
Butcher shop
-
Mannequin factory
-
Area 51
-
Corn maze
-
Haunted mansion or hotel
-
Witch’s Lair
-
Ancient Graveyards
-
Vampire’s castle
-
Glow in the Dark cemetery
Monsters and Horror Movies:
-
Clowns
-
Dracula
-
Frankenstein’s Monster
-
The Mummy
-
The Wolfman
-
Friday the 13th
-
Child’s Play
-
Slashers and Madmen
-
Zombies
Keep in mind that not every theme is suited for all audiences. Families with young children aren’t going to want to go into a gory butchers shop or have slashers chasing them. But for the intense thrill-seekers, a simple haunted mansion or graveyard probably isn’t going to cut it.
Decorating Your Haunt
Your theme will inspire how you decorate your haunt. Keep track of your budget as you start gathering props, decorations and materials. Stick to props that go with your theme, and save money where you can.
The main purpose of decorating your haunt is to create an immersive experience for your guests. Props that look cheap, cheesy, or don’t match your theme will break this immersion. This doesn’t mean that you have to splurge on fancy equipment. There are plenty of ways to find and make great props on a low budget.
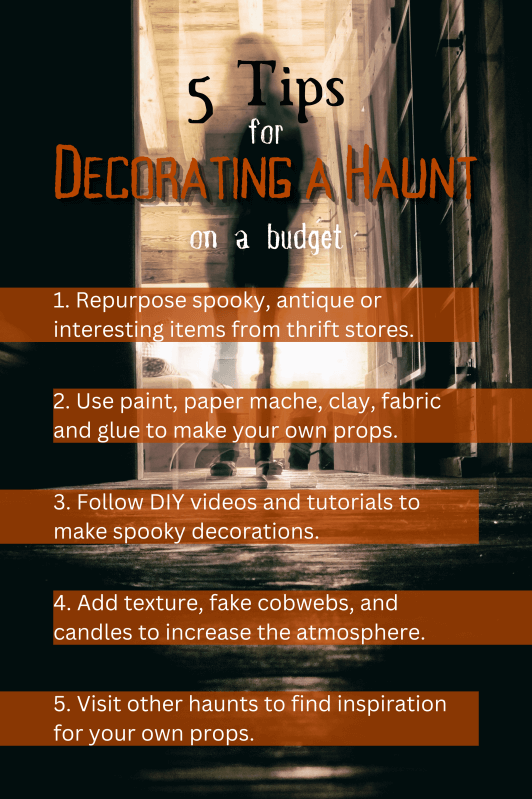
Use handmade props to save money
Instead of buying all of your decorations, put your creativity to the test and try making some of them yourself. You can find interesting objects at thrift stores or simply repurpose some of your household items. Use paint, paper mache, clay, fabric, glue, and anything else you can think of to transform your haunt.
Find inspiration from the internet and other haunts
The internet is a great resource for finding inspiration. There are plenty of DIY videos, tutorials and ideas that you can use to make your own spooky decorations. Often, handmade props will be even more impressive than the cheap, plastic props from the store.
You can also visit other haunts to find inspiration. You’re bound to see some clever ideas that you wouldn’t have thought of on your own.
Use subtle details to add life
It’s the little details that really make your haunt come to life. Textures, colors, and lighting can add a lot to your set design.
If an area of your haunt isn’t quite mysterious enough, try adding texture to make it feel old, broken and worn down. Add cobwebs in the corners, scratch up the wallpaper and scuff the paint on the furniture. Even turning down the lights can make a big difference in changing the mood.
The best haunts don’t necessarily have the most expensive props. Rather, they know how to add subtle details to change the atmosphere.
Costumes and Makeup
Your haunt needs to look good, and your actors should look even better. Transforming your actors into menacing monsters and horrific characters will really make your haunt terrifying.
For low budget costumes, try finding materials at thrift stores, garage sales, and online marketplaces. You can also try renting or buying second hand costumes from local theaters or drama groups.
Make sure your costumes match both the theme of your haunt, and the audience. This includes making the level of fake blood and gore match your target age group.
Unless your costumes have masks, you’ll also need to figure out how you’re doing your actors’ makeup. Some actors might have some experience doing special effects makeup already, and can help each other prepare their spooky look. Otherwise, you might need to hire some makeup artists or find volunteers to help your actors get ready.
Special Effects
Sound, lighting, and special effects will set the mood for your haunt. Dim lights, flickering bulbs, and eerie sounds do a lot to put your guests on edge. Darkness and claustrophobia are also major assets in making your haunt more unsettling.
Special effects don’t have to take up a lot of your budget. Here are some ideas for fun special effects that don’t use a lot of equipment.
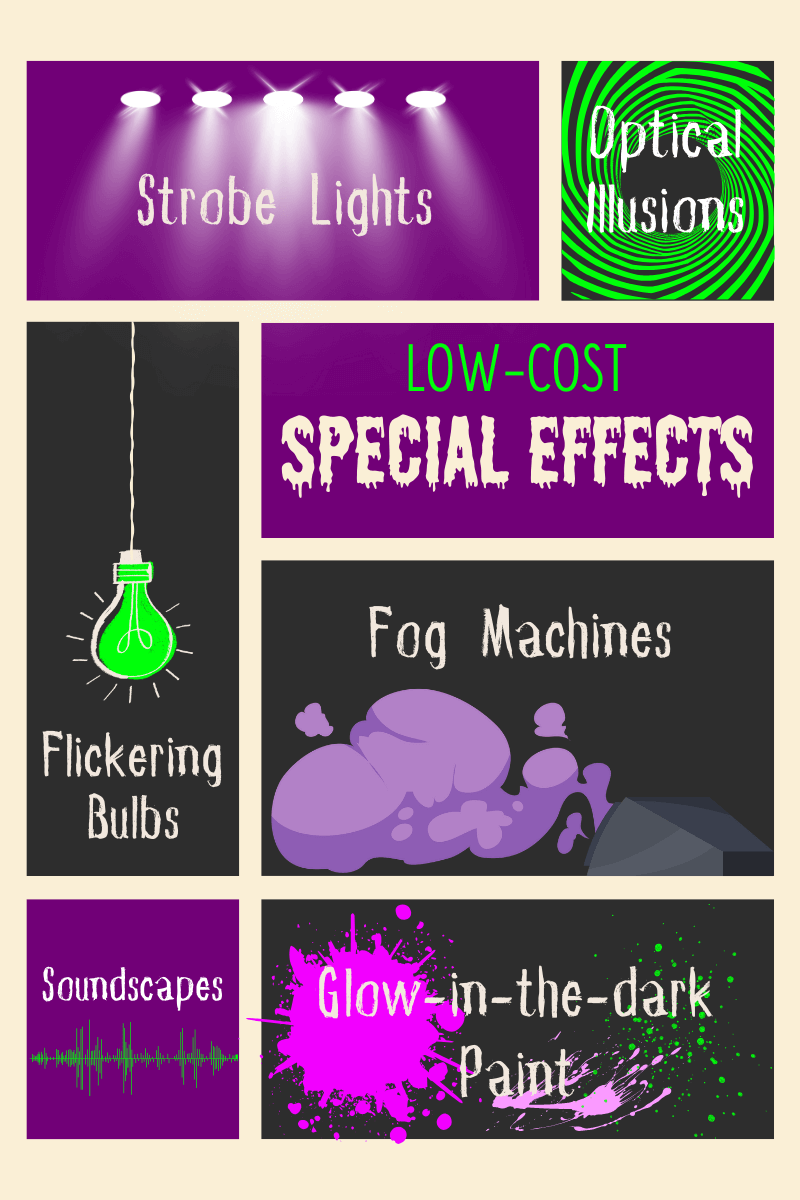
Low-Cost Special Effects:
-
Fog machines
-
Strobe lights
-
Flickering light bulbs
-
Soundscape apps
-
Glow in the dark paint
-
Optical illusions
Use Claustrophobia and darkness to your advantage
To add a sense of claustrophobia to your rooms, make them either narrow with high ceilings, or wide with low ceilings. Small dark spaces mess with people’s senses and add to the atmosphere for your haunt. Making them uncomfortable in the space makes them easier to scare.
Low light levels add to the atmosphere and makes your decorations more believable. Light only what you want people to see and keep everything else dark. The darker it is, the harder it will be to know where the scares are coming from.
Sound Design and Soundproofing
Eerie, spooky sounds can add another scary factor to your haunt. Sounds can put people on edge, make them feel immersed, and even startle them at the right times.
However, it’s important that you can’t hear unwanted sounds from outside, other guests, or different rooms. Any sound or light bleeding between areas will break the suspension of disbelief that you’re trying to create.
There are two options for designing the sound in your haunt:
-
Single Soundtrack: Use a single soundtrack throughout the whole haunt, and add only smaller noises and sound effects in each individual room. This approach avoids the problem of sound bleeding, but might be less interesting or effective.
-
Multiple Soundtracks: Use unique sound effects and soundtracks for different areas of your haunt. This approach can keep things interesting for your guests and add to your storyline, but you’ll have to add some soundproofing to keep your effects isolated.
Here are some low-budget tips to improve your sound design:
-
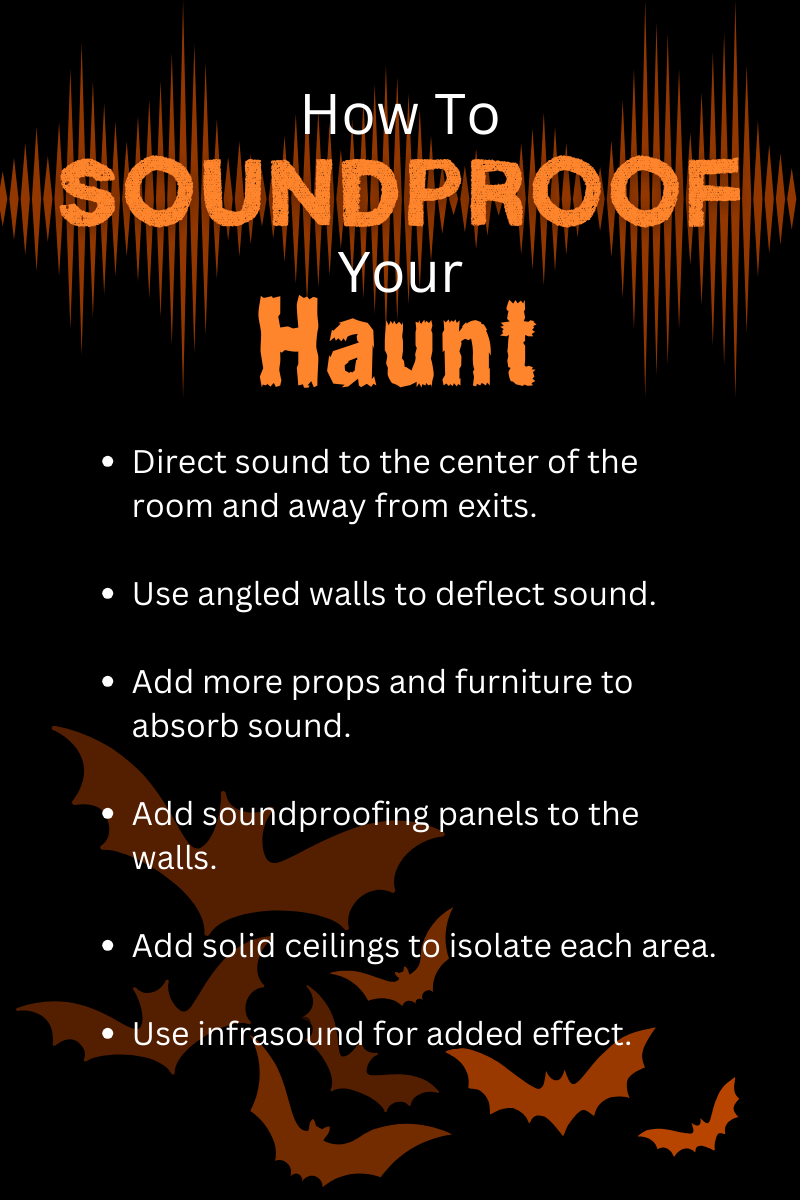
Direct sound to the center of the room and away from exits. This can be done by placing speakers up high and pointing them down towards the center of the room.
-
Use angled walls to deflect sound. Sound bounces easily off of 90 degree angles, which can make for an echoey haunt. Try putting at least one wall at an angle to keep the sound from bouncing into the next room. This can be especially effective at the transitions between rooms.
-
Add more props and furniture to absorb sound. Soft objects are great at absorbing unwanted sound. The more objects you put in the room, the less sound will be able to escape.
-
Add soundproofing panels to the walls. You can make your own soundproofing panels with fireproof insulation, or any other sound deadening materials. Like props and furniture, these will absorb sound and keep it from going into the other rooms.
-
Add solid ceilings to isolate each area. Haunts without ceilings allow sound to bleed over the walls into the nearby rooms.
-
Use Infrasound for added effect. Infrasound is very low frequency sound (below 20Hz) that most people can feel, but won’t be able to hear. Because it’s below the standard threshold of human hearing, your guests won’t hear anything, but it will create an eerie, unsettling feeling.
When your haunt looks, sounds, and works great, your attendees are bound to love it! Now that you have some ideas to improve your haunt design, it’s time to get to work creating an amazing, spooky, and thrilling experience.